
How to Resolve Sage X3 Warning Message for ENDDAT Parameter
There’s nothing more frustrating than opening your Enterprise Resource Management (ERP) solution and getting a warning message for a problem you don’t know how to fix. One of the most common errors Sage X3 (also known as Sage Enterprise Management) users encounter is for the end date (ENDDAT) parameter, and they receive the following warning message:
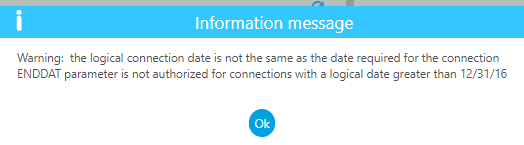
Warning: the logical connection date is not the same as the date required for the connection
ENDDAT parameter is not authorized for connections with a logical date greater than 12/31/XX.
This warning occurs when the parameter for the ENDDAT folder is set to a date that is earlier than the server’s system date or the date entered in the Connection screen. For example, if it is January 1st, 2017 but your ENDDAT parameter is set to December 31st, 2016, you would receive this warning. Don’t worry though, this issue is easily resolved so instead of spending time calling your IT department of solutions partner, we’re giving you a simple step-by-step guide for how to update your settings and even better, how to prevent this issue from reoccurring again in the future.
Solution for ENDDAT Parameter Warning
Step 1: Click Ok on the warning message.
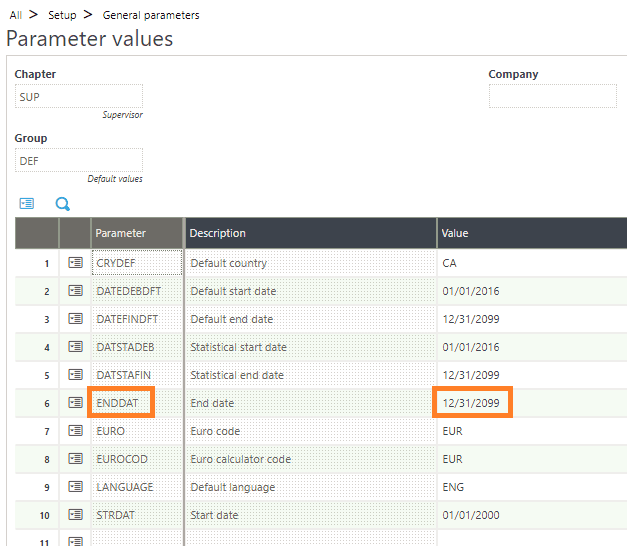
Step 2: In the top menu, select Setup. From the dropdown menu that appears select General parameters and then Parameter values, which will redirect you to a new screen.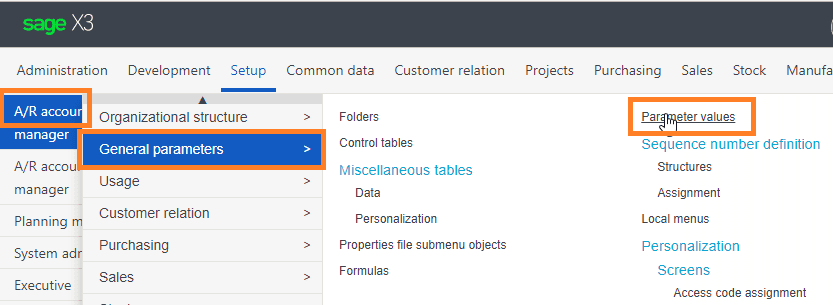
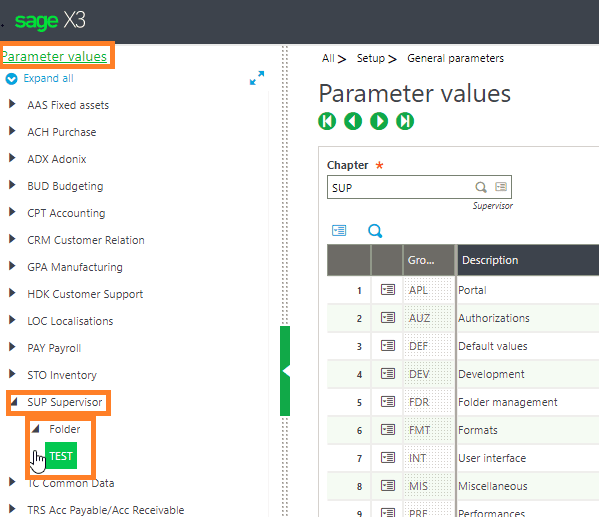
Step 3: In the General values screen, click on the black triangle to expand SUP-Supervisor. You will now be able to see Folder, which you can expand further by clicking the black triangle next to it. Once this is expanded you will see a few folder options depending on your setup – click on the folder name that you received the warning message for. For the purpose of this example we are using the folder labelled TEST. When you select the folder you need it will be highlighted in green and will open the Parameter Values.
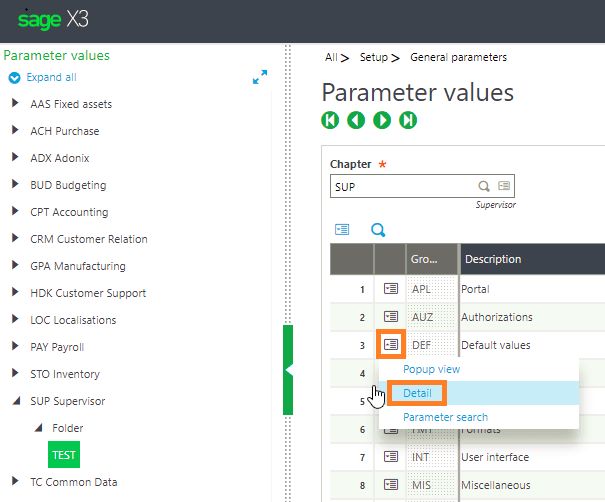
Step 4: In this section, search for the group called DEF (in the third column), with the description ‘Default values’. Click on the action icon next to DEF, and in the menu that pops up select Detail.
Step 5: This will open the window with the detailed options for Default values. In the Parameter column, find ENDDAT (with the description End date) and update the Value column with a date that is a minimum of 1 year later. To update the date click on the value box and manually type in the desired date. For example, if it says 12/31/2017, the earliest date you should update it to is 12/31/2018, however to prevent receiving this warning message every year, we suggest you use a date really far in the future, such as 12/31/2099. Click ok and save to finalize the changes.
It’s your choice whether you manually update the date specified for ENDDAT every year, or set the date far into the future so you don’t have to keep updating it. Whatever your preference, now you know how to do it!
If you are still encountering issues and you’re a client of ours please reach out to your Account Manager or info@theanswerco.com for assistance. If you’re not a client, you can reach out to your respective solutions partner for additional support or of course, we’re happy to help.