
Sage 300cloud Tips & Tricks – Part 1: Modifying Your View
Whether you’re currently using Sage 300cloud (formerly Sage 300c) or doing some investigation into the product, this 2-part tips & tricks series will offer you step-by-step guides and helpful insight into how you can modify Sage 300cloud (formerly Sage 300c) to accommodate your needs. In case you’re just jumping in, Sage 300cloud (formerly Sage 300c) is a new web screens version of Sage 300 that offers enhanced and expanded capabilities.
Two of the leading features users are most excited about in Sage 300cloud (formerly Sage 300c) are: the flexibility to edit or modify fields, and the ability to hide columns. To ensure you’re getting the most out of these features we’ve compiled a step-by-step guide for how you can enable and utilize them. The first modification can only be done by a System Administrator, but the second can be done by Users and Admins alike.
How to Edit or Modify fields in Sage 300cloud (formerly Sage 300c)
Note: Editing or modifying fields can only done by a System Administrator. If you are a User and not a System Administrator this information is still valuable to you so you can gain insight into what requests you can make for fields to be edited in your Sage 300cloud (formerly Sage 300c) solution.
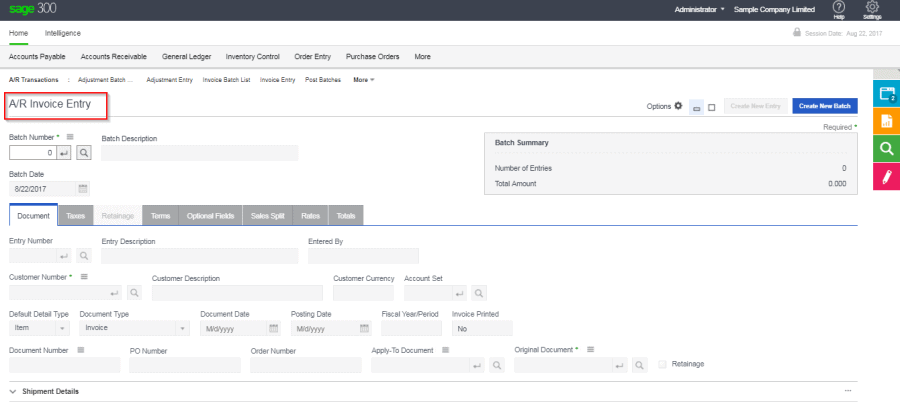
Step 1: Go to the window that contains the field that you want to change. For this example, we are going to modify the field labelled ‘A/R Invoice Entry’.
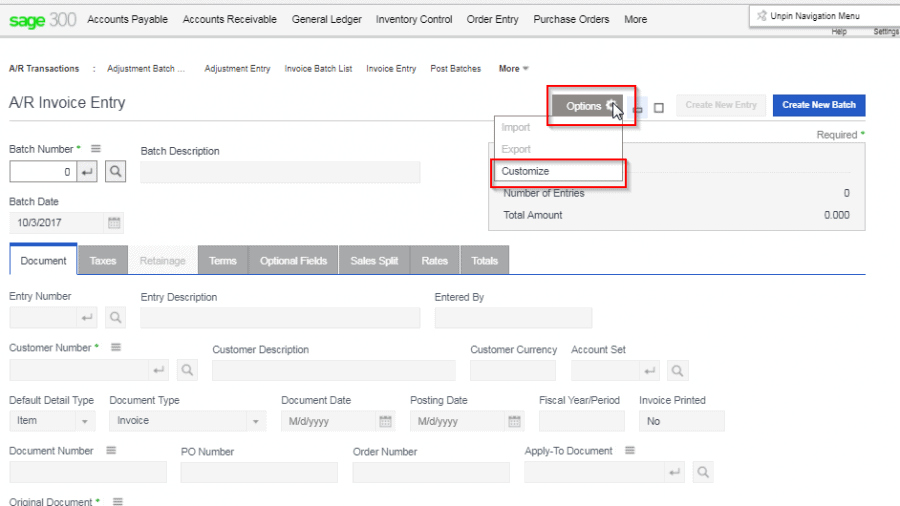
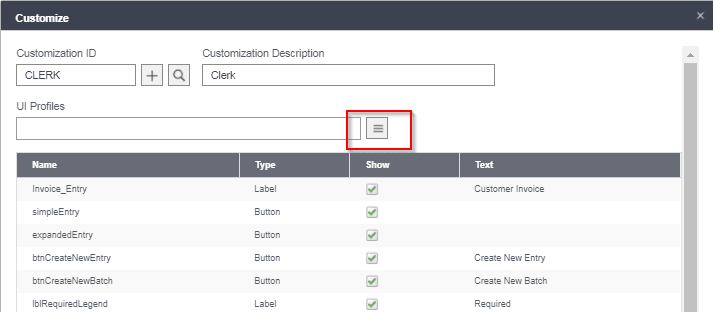
Step 2: Click on Options and select ‘Customize’. This will open the ‘Customize’ window in a popup which is where you will be able to edit the field label.
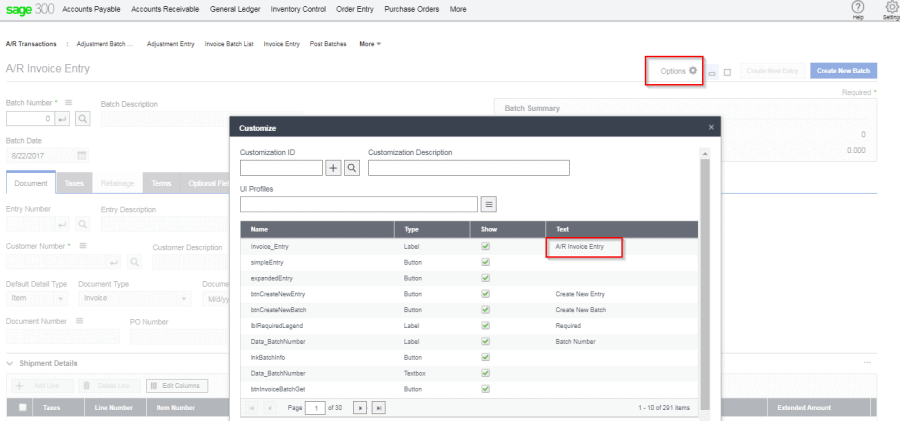
Step 3: In the Customize window, look for the field that you want to change in the Text column. For the purpose of this example, we are going to update the field Invoice_Entry that is currently labeled ‘A/R Invoice Entry’ to be ‘Customer Invoice’ instead.
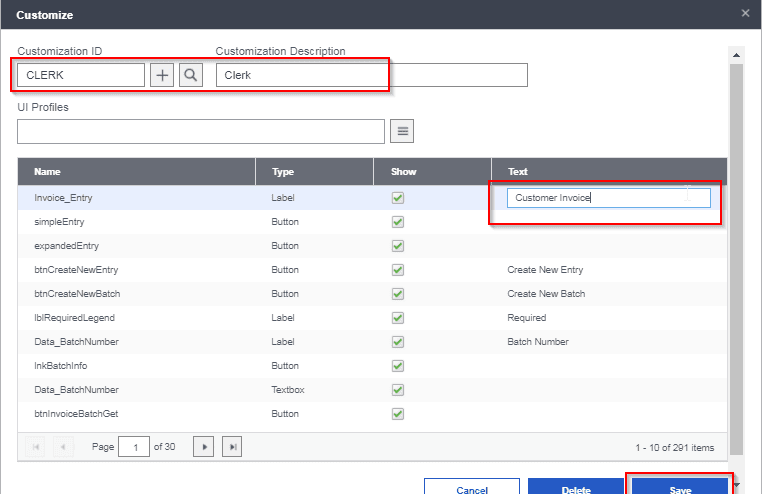
Step 4: When you’ve located the field label that you would like to update in the Text column, click on the box with the current label and type in your desired label. Once the text column has been updated with the new field label (‘Customer Invoice’), but before you click Save, you need to also select a Customization ID. Each customization has to be tied to a specific UI Profile that specifies a group in your company (such as Accounting, Purchasing, Marketing, etc.). Select the profile you would like this change applied to, in this case Clerk, and click Save.
In many cases the UI Profile will already contain the users you would like the change applied to, however in some cases you may want to add additional users. In the next step, which is optional depending on your needs, we’ll show you how you can add additional users to a UI profile so they can benefit from the customization as well. Feeling a bit confused? Don’t worry, everything is explained in the bonus insight and following steps.
Bonus Insight for Users The UI Profile is like a group; it’s a way of creating different categories of users in your Sage 300cloud (formerly Sage 300c) solution for various customizations and restrictions. One benefit of this feature is that users can be added into multiple different UI Profiles so you can customize user profiles in multiple ways at once.
The Customization ID is assigned to a UI Profile which should already be set up for you by your system administrator, and could for example be Accounting, Purchasing, Marketing, Support, Clerk, etc. While a UI Profile may be an entire department, it may also just be a team within a department because different groups have different requirements. The Customization Description shows the description of the profile you’ve selected (Customization ID) but in this example Clerk is self-explanatory so no further explanation was deemed necessary.
A UI Profile can have multiple customization IDs attached to it. In our example, we changed the label for the AR Invoice Entry screen, but you can create additional customizations for the AP Invoice Entry screen and attach it to the same UI Profile (Clerk). Once you’ve added a customization ID to a UI profile, then that entire group is affected.
Step 5a (optional): This is an optional step that should be completed if you would like to add additional users to the UI Profile you’ve selected for this customization. First, in the same ‘Customize’ window that you edited the field label, click on the menu button for UI Profiles.
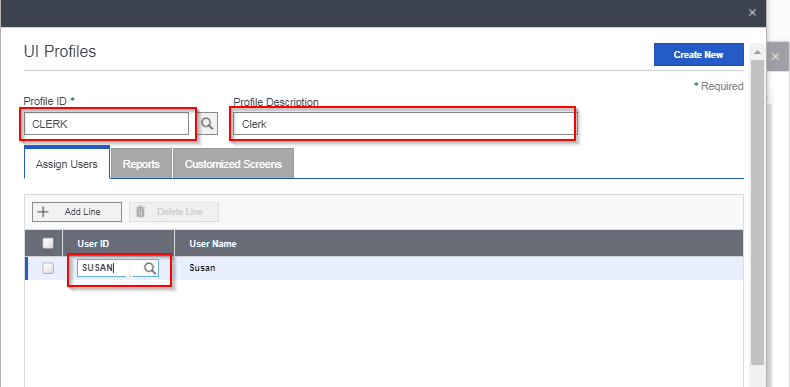
Step 5b: Once in UI Profiles, type in the name of the user you would like to add in the search function under ‘User ID’ and hit enter or click on the magnifying glass. This will open a pop-up window with the users that match your search (for reference, see image 2 in this step). Once you’ve found the user you would like to add, in this case Susan, click the user and then click select to add her to the UI Profile. This will automatically close the ‘Select User ID’ pop-up window.
If you would like to add more users select ‘+Add Line’ in the ‘UI Profiles’ window and repeat the instructions in step 5b until you have added all of the users you would like to add to this UI Profile. Once complete, close the UI Profiles window.

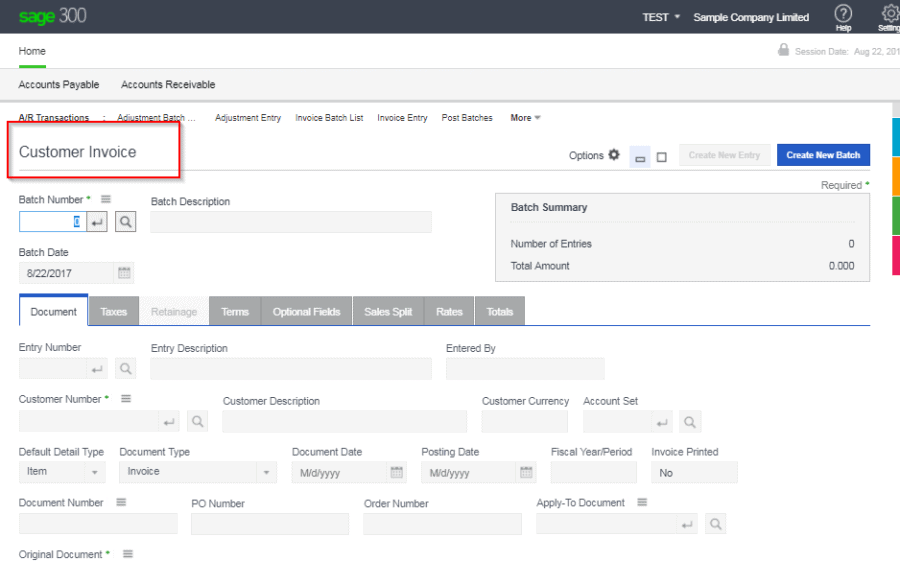
Step 6: Next, all of the users that you have selected for this change have to log out and back into Sage 300cloud (formerly Sage 300c) to activate the changes. Once logged back in, they will see that the A/R Invoice Entry field has been successfully updated to Customer Invoice.
How to Hide a Column in Sage 300cloud (formerly Sage 300c)
Note: This change can be made directly by the user.
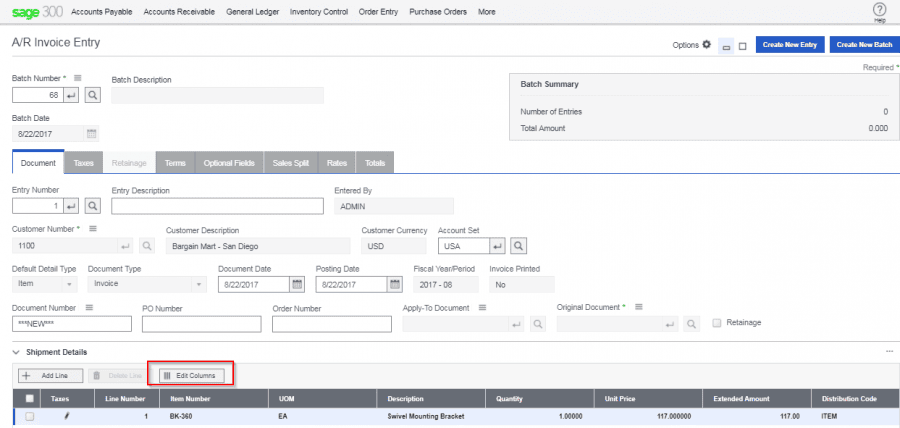
Step 1: Start by opening the window that contains the column you would like hidden. In this example, we will be hiding a column in the A/R Invoice Entry window. Click the button Edit Columns.
Step 2: In the Edit Columns menu that opens, find the column that you wish to hide, and click the box to remove the green checkmark – this will hide the column. Click ‘Apply’ to save your changes. These changes will only be applied to your view, and they will stay in effect even after logging in and out of Sage 300cloud (formerly Sage 300c) . If other users wish to have make the same change they will have to do that through their own account or with the assistance of the system administrator.

And there you have it! While these changes seem simple, having the flexibility to edit fields and control which columns are shown enables you to have Sage 300cloud (formerly Sage 300c) reflect your preferences. Having fields and columns shown that accurately reflect how you’re using the system will enable you to be more productive and work more efficiently.