
Part 2 of 3: Pay Equity Reporting in Sage HRMS
When it comes to conducting an internal assessment of pay equity, many businesses don’t even know where to start. Since Human Resources tracks the information surrounding Pay Equity though, Human Resource solutions can be ideal tools for pay equity reporting. As explained in part one of this blog series, pay equity describes equal pay for the same job or work of equal value regardless of gender, and there are growing demands from society for pay equity to be established.
Sage HRMS has 8 out-of-the-box reports that can be used to review pay equity as well as employment equity. We’ll outline what information each of these reports gives you and where you can find them. In order for these reports to be utilized to their best capacity they require a certain degree of set-up, which is typically done together with a solutions partner when Sage HRMS is first implemented, or during the process of designing and implementing a structured pay equity program. Since you may not be doing the full set-up yet, we’re also going to show you a simple report you can create in HRMS to review role, gender and salary. Whether you already use Sage HRMS or are simply interested in what it can do, you’ll find information that’s useful!
Pay Equity and Employment Equity Reports in Sage HRMS
Pay equity is only one piece of the puzzle. Sage HRMS offers 8 out-of-box reports that each review a different aspect of equity in your business, coming together to give you a well-rounded perspective of how your employees are being treated across of all stages of employment, regardless of their gender, ethnicity or disabilities. These reports are split into two sections: Pay Equity & Employment Equity.
PAY EQUITY
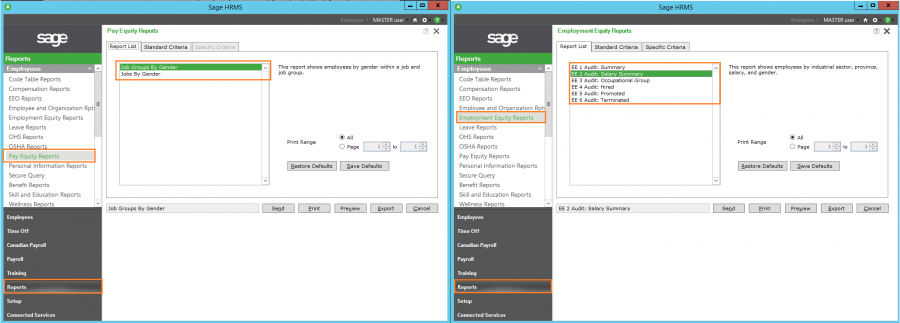
- Jobs by Gender – This report lists employees by gender within a specific job. For example: Controller, Accounts Receivable, and Accounts Payable.
- Job Groups by Gender – This report groups jobs together, displaying all job codes and titles within the group, broken out based on gender. For example: all Accounting roles, or all Marketing roles.
EMPLOYMENT EQUITY (EE)
- EE 1 Audit: Summary – This report lists give you a summary of employees sorted by designated CMA (Census Metropolitan Area), employment status, industrial sector (e.g. Business Services, Educational Services, Food and Beverage etc.)and province.
- EE 2 Audit: Salary Summary – This report lists employees by industrial sector, province, salary and gender.
- EE 3 Audit: Occupational Group – This report lists employees by province, CMA, salary, employee name and ID, number of active and inactive employees, and total number of employees by gender.
- EE 4 Audit: Hired – This report displays information for the new employees hired between a selected from and to date.
- EE 5 Audit: Promoted – This report displays information for employees promoted between a selected from and to date.
- EE 6 Audit: Terminated – This report displays information for employees who were terminated between a selected from and to date.
These reports can be accessed and exported from the reporting tab in Sage HRMS, as seen below:
One thing that none of the out-of-box options show is role, gender and salary in one report. Luckily that’s an easy report to create in Sage HRMS and it doesn’t require any special or extra set-up to use. Follow the steps in the next section to create that report, which serves as a great starting point for getting an idea of where your business stands.
How to Create a Report comparing Role, Gender and Salary in Sage HRMS
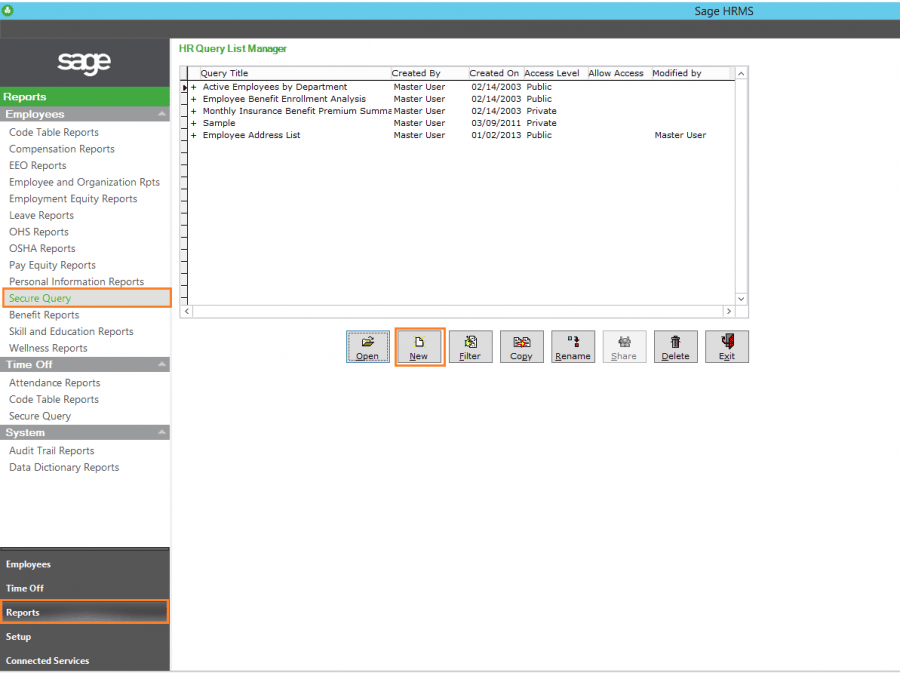
Step 1: At the bottom of the left-hand side menu panel of Sage HRMS, select Reports. Ten from the menu above (as shown in the left side of the image below) where you need to select Secure Query. This will open the HR Query List Manager. The list shown contains Queries that have been created in the past, so note that yours will be different than the ones shown in the example below. Next, click the New button to create a new query.
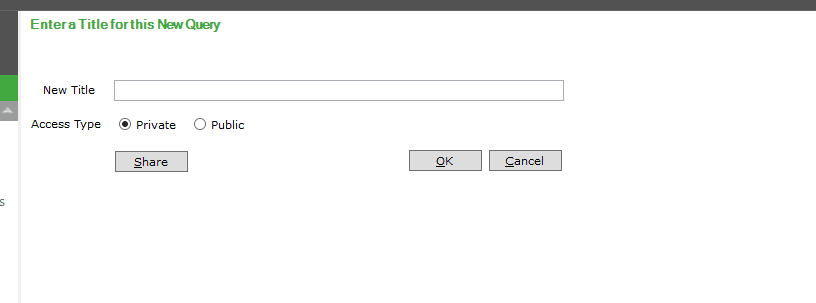
Step 2: Clicking the New button will open up the following pop-up window. Click on the New Title field to enter a title for your new query and select whether you only want to make the report Private, available only to you, or Public, available to all of your HRMS users. If you only want to share the report with a few users, you can select Private and then click the Share button to specify which users. Click Ok to continue.
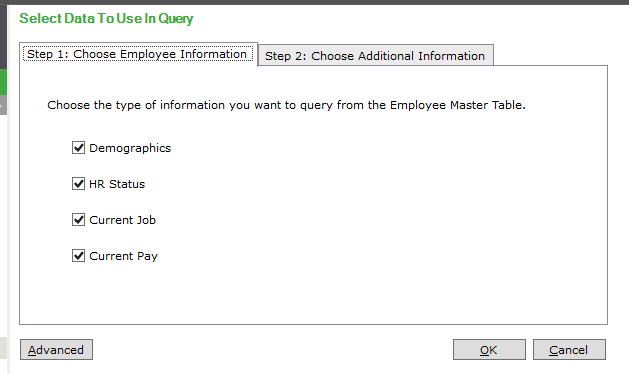
Step 3: This will bring you to the Select Data To Use In Query screen where you need to indicate which type of information you want to include in your report. Make sure that you leave all four boxes checked so you have access to all of the fields available in the next step. Click Ok to continue.
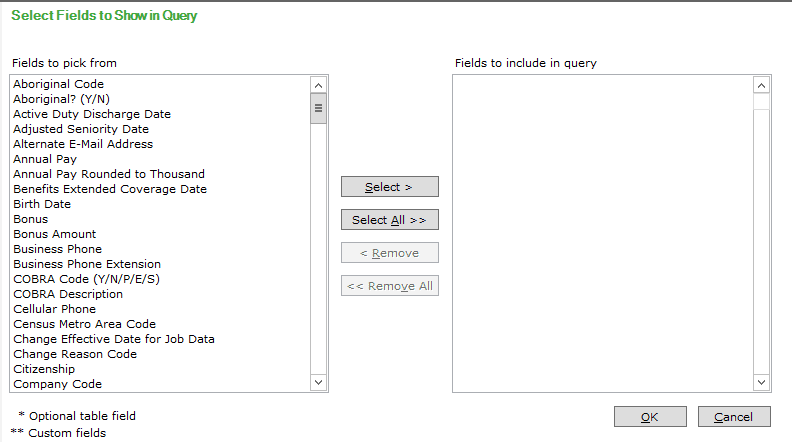
Step 4: This will open the Select Fields to Show in Query screen, whereas the name says, you select all the fields you want to show in your report from the list provided. Click on the field you need in the ‘Fields to pick from’ list on the left, and click the Select button to move it to the ‘Fields to include in query’ list on the right. Alternatively, you can double click the field to move it over. To create this pay equity report we recommend the following fields, however you can add or remove fields based on your specific needs/preferences:
Employee ID
Job Code
Job Code Description
Gender (M/F)
Annual pay
Hours/Units Per Pay Period
Adjusted Seniority Date
Last Pay Effective Date
Performance Review Date
Performance Review Rating Description
Once you have double clicked or used the Select button to move all the above fields into the section on the right, click the Ok button to move to the next step and review your fields.
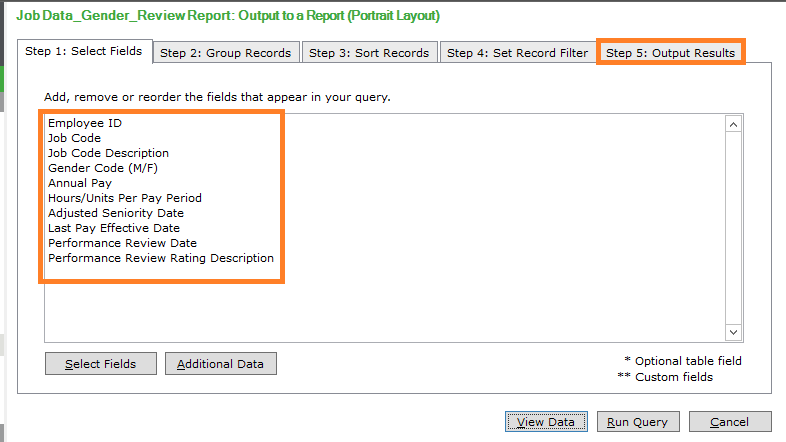
Step 5: This will bring you to a summary screen. Double check to confirm that you have all of the fields included in the image below. Following this, you can click on the tabs for Step 2, Step 3, and Step 4 to specify more details about how you may want the information in the report summarized, grouped, sorted and filtered. These tabs are very straight forward and will change depending on the specific needs of your business, so for the purpose of this explanation we aren’t going to go through them.
Once you’ve specified the information in those tabs click Step 5: Output Results to specify how you want to export the report.
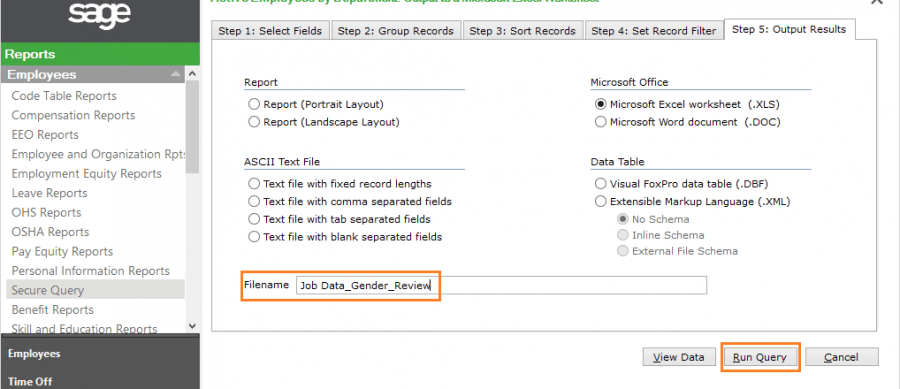
Step 6: In the Step 5: Output Results tab, select the form that you want the report to take. For the purpose of this example, we’ve selected Microsoft Excel Worksheet (.XLS). Next, fill out the blank field next to Filename to name your report. Finally, click the Run Query button to run your report.
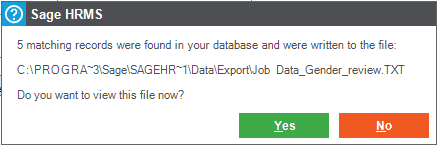
Step 7: When the query is done, Sage HRMS will notify you of the number of records and ask if you wish to review the file now. If you click No the report is saved to the following location: \\PROGRAMDATA\SAGE\SageHRMSServer\Data\Export
If you click Yes it will automatically open up the report so you can review it right away.
Step 8: Since we selected excel, the report looks like this:

Despite the fact that Pay Equity is something that society is demanding more and more, most businesses have never conducted an assessment of where their business currently stands. While the project of putting in place standards and practices to enforce pay equity can be a much larger task, every business should at least know what the current situation is among their employees. Sage HRMS centralizes your employees’ job, pay and demographic information which enables you to identify if and where pay gaps may be, so you can start the conversation for how to change it.