Part 3 of 3 – Pay Equity Reporting in Sage People
In the final segment of our Pay Equity series we’re going to show you how you can create a report to help you review pay equity in Sage People. If this is the first blog you’re reading in this series, we strongly recommend that you start with Part 1 to ensure that you’re not missing out on valuable information surrounding pay equity and the value that human resource solutions can bring.
Sage People is a cloud-based Human Capital Management (HCM) solution that is easily accessed online, enabling employees to be more involved with HR processes, and integrates with your other business systems (ERP, CRM, etc), giving you access to real-time company-wide information. It also includes out-of-the-box reports that can be used to review pay equity, however these reports aren’t explicitly categorized as pay equity reports so need a little tweaking to get the right information. We’re going to give you some insight into the available out-of-the-box reports, as well as a step-by-step guide for how to create a simple report to serve as a starting point for reviewing pay equity.
Pay Equity and Employment Equity Reports
Has your business reviewed pay equity and employment equity recently… or ever? While the Canadian Employment Equity Act has set clear guidelines for employment equity since 1995, the laws and legislation surrounding pay equity vary depending on where you are in Canada. Even so, one thing has become very clear: pay equity is a real issue and society is pushing for real change. Whether or not it’s required from a legal standpoint, your employees want to be treated equally and rewarded based on their role, skills, and performance, not their gender, ethnicity, or disabilities.
In part 2 of this series we highlighted a number of out-of-the-box reports that are available in Sage HRMS for both employment equity and pay equity. Sage People also offers features and reports to help your business manage & monitor both goals and targets surrounding employment and pay equity throughout the HR processes. One example of these features is dashboards, such as the ‘Headcount by Gender’ dashboard that displays the current headcount grouped by gender, including details such as name, job title, division, annual salary and total headcount in each gender. Pre-defined dashboards can be customized to include or exclude the specific information you need, or you can create your own dashboards from scratch. These built-in dashboards enable you to get a comprehensive view of real-time pay equity with a single glance.
Looking at employment equity specifically, under the Canadian Employment Equity Act businesses are required to be able to put together reports detailing information about the demographic of employees, occupational groups, salary ranges and number of employees hired, promoted and terminated in designated groups. Sage People tracks all of this information and offers simple drag and drop report building functionality that ensures that you can easily compile all of the details you need in one, or multiple, reports specific to the structure and demands of your business.
You will be able to maximize the benefit of the features and reports in Sage People once your business establishes a pay and/or employment equity program, but to give you some more insight into what’s available we’re going to show you where to find and how to use the Gender Pay Analysis by Country/Function out-of-box report which is helpful for reviewing pay equity. On its own this pre-defined report gives you some of the information you need to review pay equity, but we’re going to show you how to modify it to include the rest of the information you need to conduct a basic Pay Equity Review with one report.
How to Review Pay Equity in Sage People
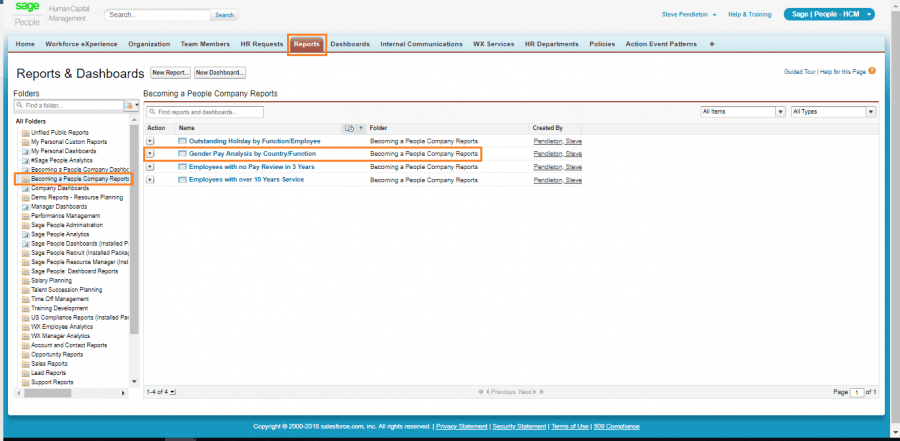
Step 1: Login to the HR Portal and select Reports from the navigation bar at the top. If you don’t see Reports click the + symbol to expand the navigation bar.
Clicking on Reports will provide you with a list of all your report folders in the panel on the left-hand side. In these folders there are pre-defined (out-of-the-box) reports that are useful for that activity and/or department. To find the pre-defined report we need, click to select Becoming a People Company Reports. In this folder you will find the report Gender Pay Analysis by Country/Function, click to open that report.
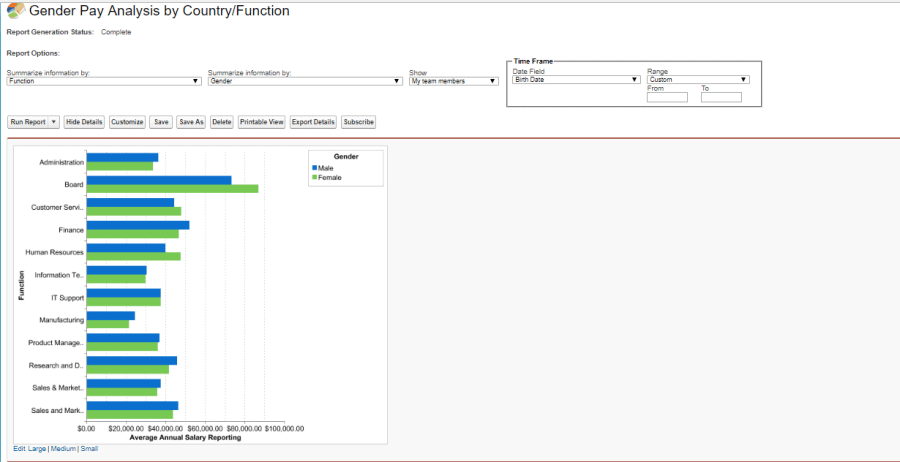
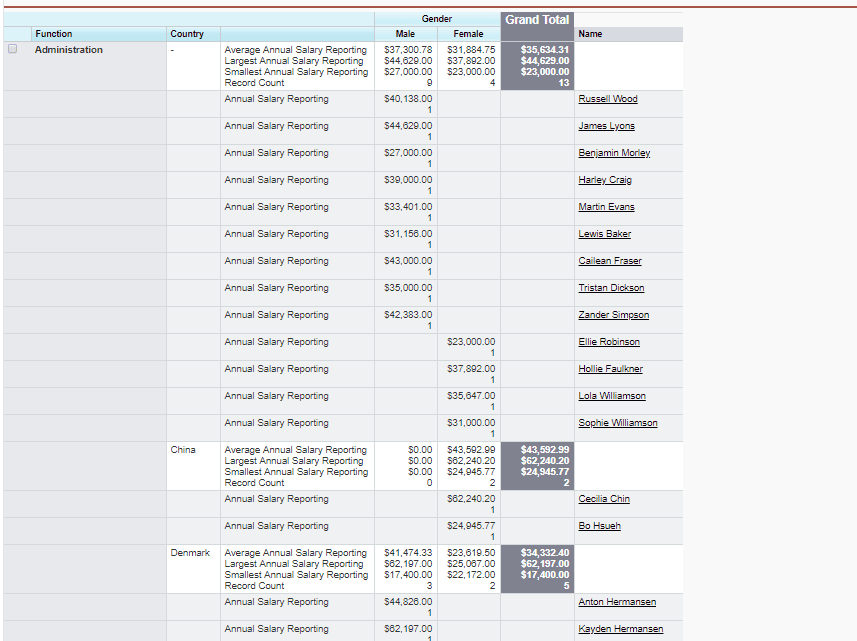
Step 2: When you initially open the Gender Pay Analysis by Country/Function report the detailed information will be broken out by function (i.e. department) and country. Please note that the only countries that will be included in the report are the ones you have employees in. See the images below for reference and note that these images actually make up a single page in Sage People, so to get from the summary graph to the detailed table all you have to do is scroll down.
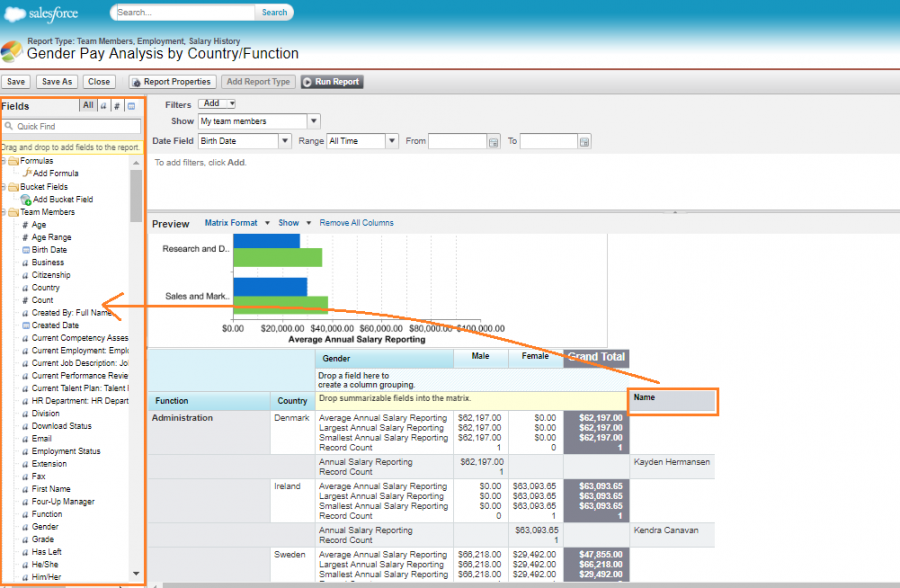
Step 3: To improve the detail included in this report we are going to edit it to include Job Title. Additionally, we are going to show you how you can remove Name to protect the anonymity of your employees in the report.
a. Start by clicking on Customize to open up the edit window.
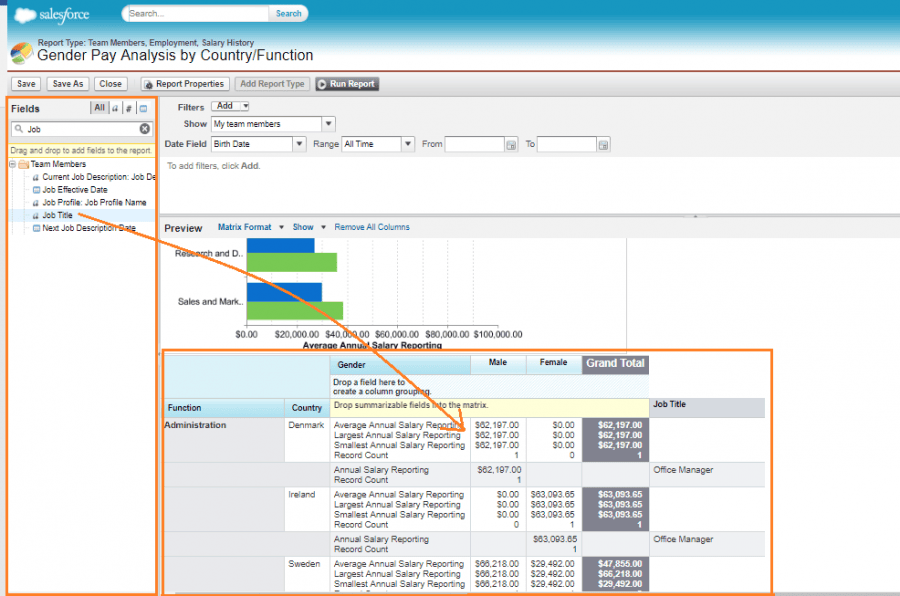
b. In the edit window, you can change the information included in your report. The system is drag and drop, so to remove the Name field all you have to do is click and drag Name into the Fields panel on the left-hand side, as illustrated in the image below.
c. Similarly, to add the Job Title field, scroll through the Fields panel on the left-hand side (or use the search bar as we did with the term “job” to narrow options) to find Job Title, click and drag it over to your report and release.
For the purpose of reviewing pay equity it’s important to have gender, salary and job title, but feel free to repeat 3b and 3c to further modify the fields to suit your specific needs.
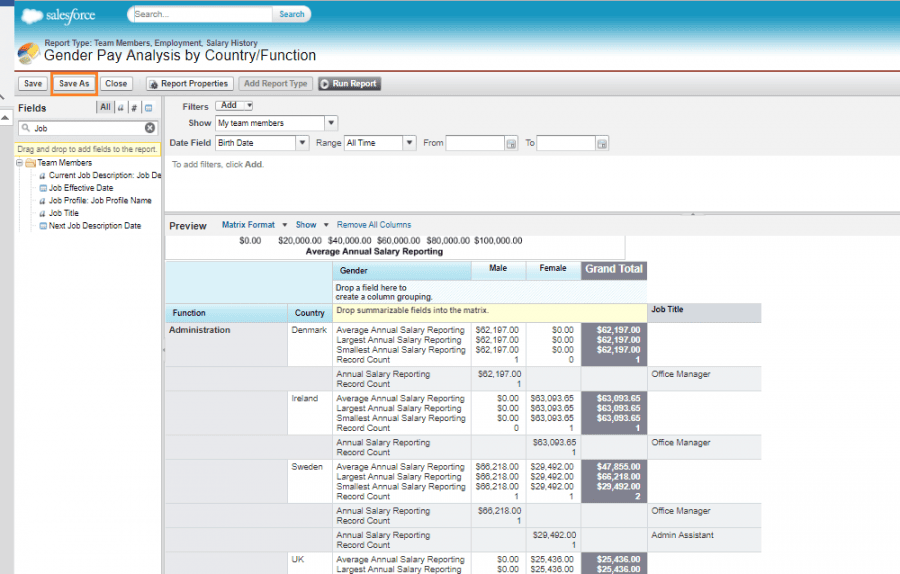
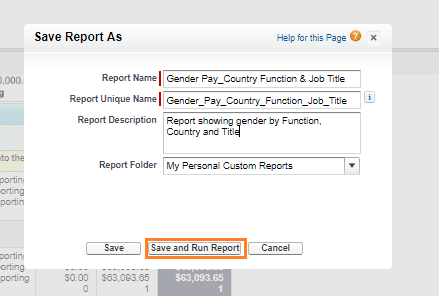
Step 4: Click Save As to save your new report. Clicking save will open the following pop-up window. Fill in the Report Name, Unique Report Name and Report Description. Make sure you give it a logical name so it’s clear exactly what the report includes.
Step 5: Finally, under Report Folder you can choose where your report will be stored: in your Personal Folder or in WX Manager Analytics, which is a tool in Sage People that enables users to share reports with specific teams or individuals. Finally, click Save and Run Report.
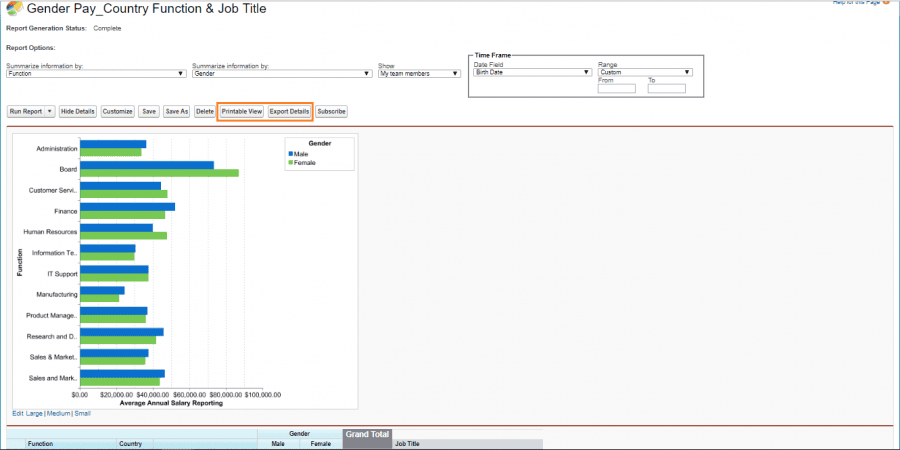
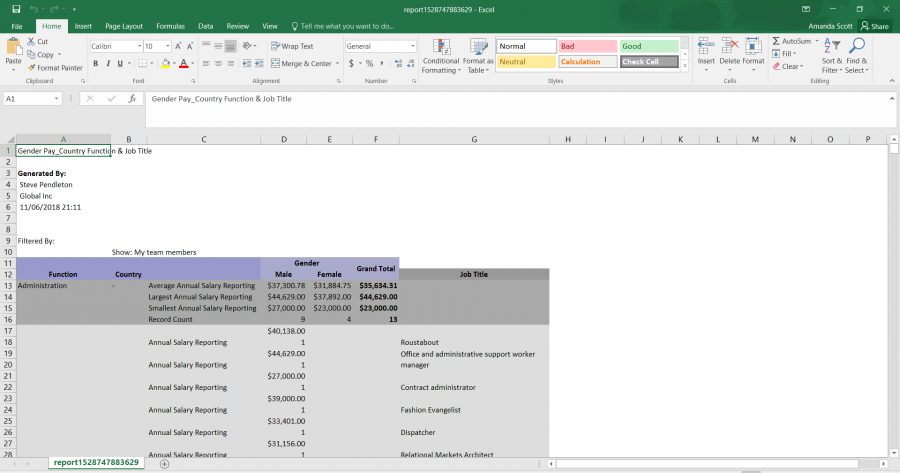
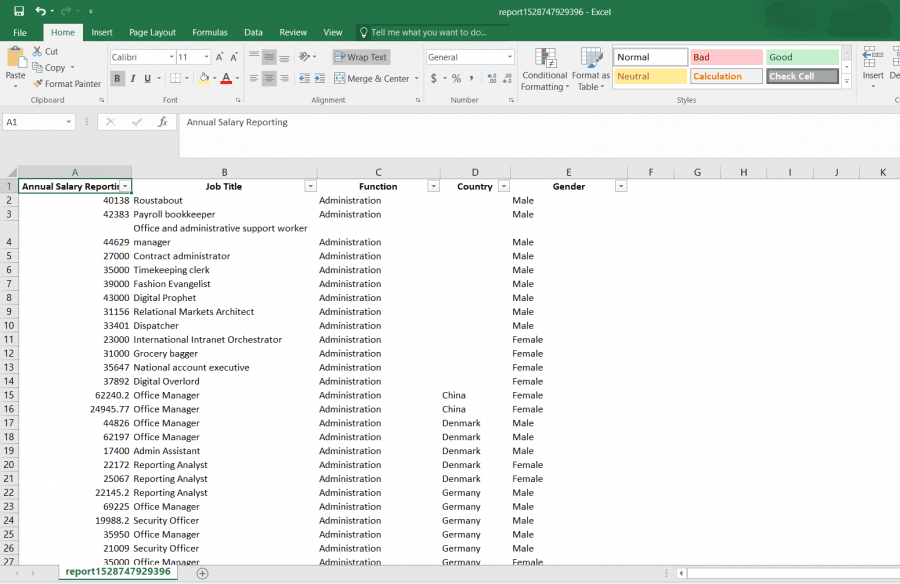
Step 6: This will bring you back to your report screen with refreshed data, which is displayed in a convenient summary graph. While these graphs are great for getting a general overview, you can also export the data into a spreadsheet so you can sort, manage and share the data however you need to. Select Printable View to export the data into spreadsheets in a print-friendly formatted version or click Export Details to export the data into an unformatted spreadsheet.
Printable View Report
Export Details Report
The benefit of utilizing a modern cloud-based solution like Sage People is the ease of use. Not only do you have out-of-the-box reports at your disposal, but you also have pre-defined and customizable dashboards, and the ability to easily modify both reports and dashboards with drag and drop functionality. This empowers businesses to be able to easily create detailed reports that evaluate pay equity and employment equity, whether you are looking to review it to adhere to certain government requirements or simply curious where your business stands.
Reviewing pay equity to determine if there is a gender pay gap is the first step in understanding the state of equality in your business. The tools provided in human resource solutions like Sage People can help you not only evaluate equality in your business, but monitor and track it so you can be proactive in making changes to improve equality. Ensuring that you’ve created reports and set up your solution so it’s delivering the information you need for pay equity and employment equity can feel overwhelming but working with a partner can make this simpler.

